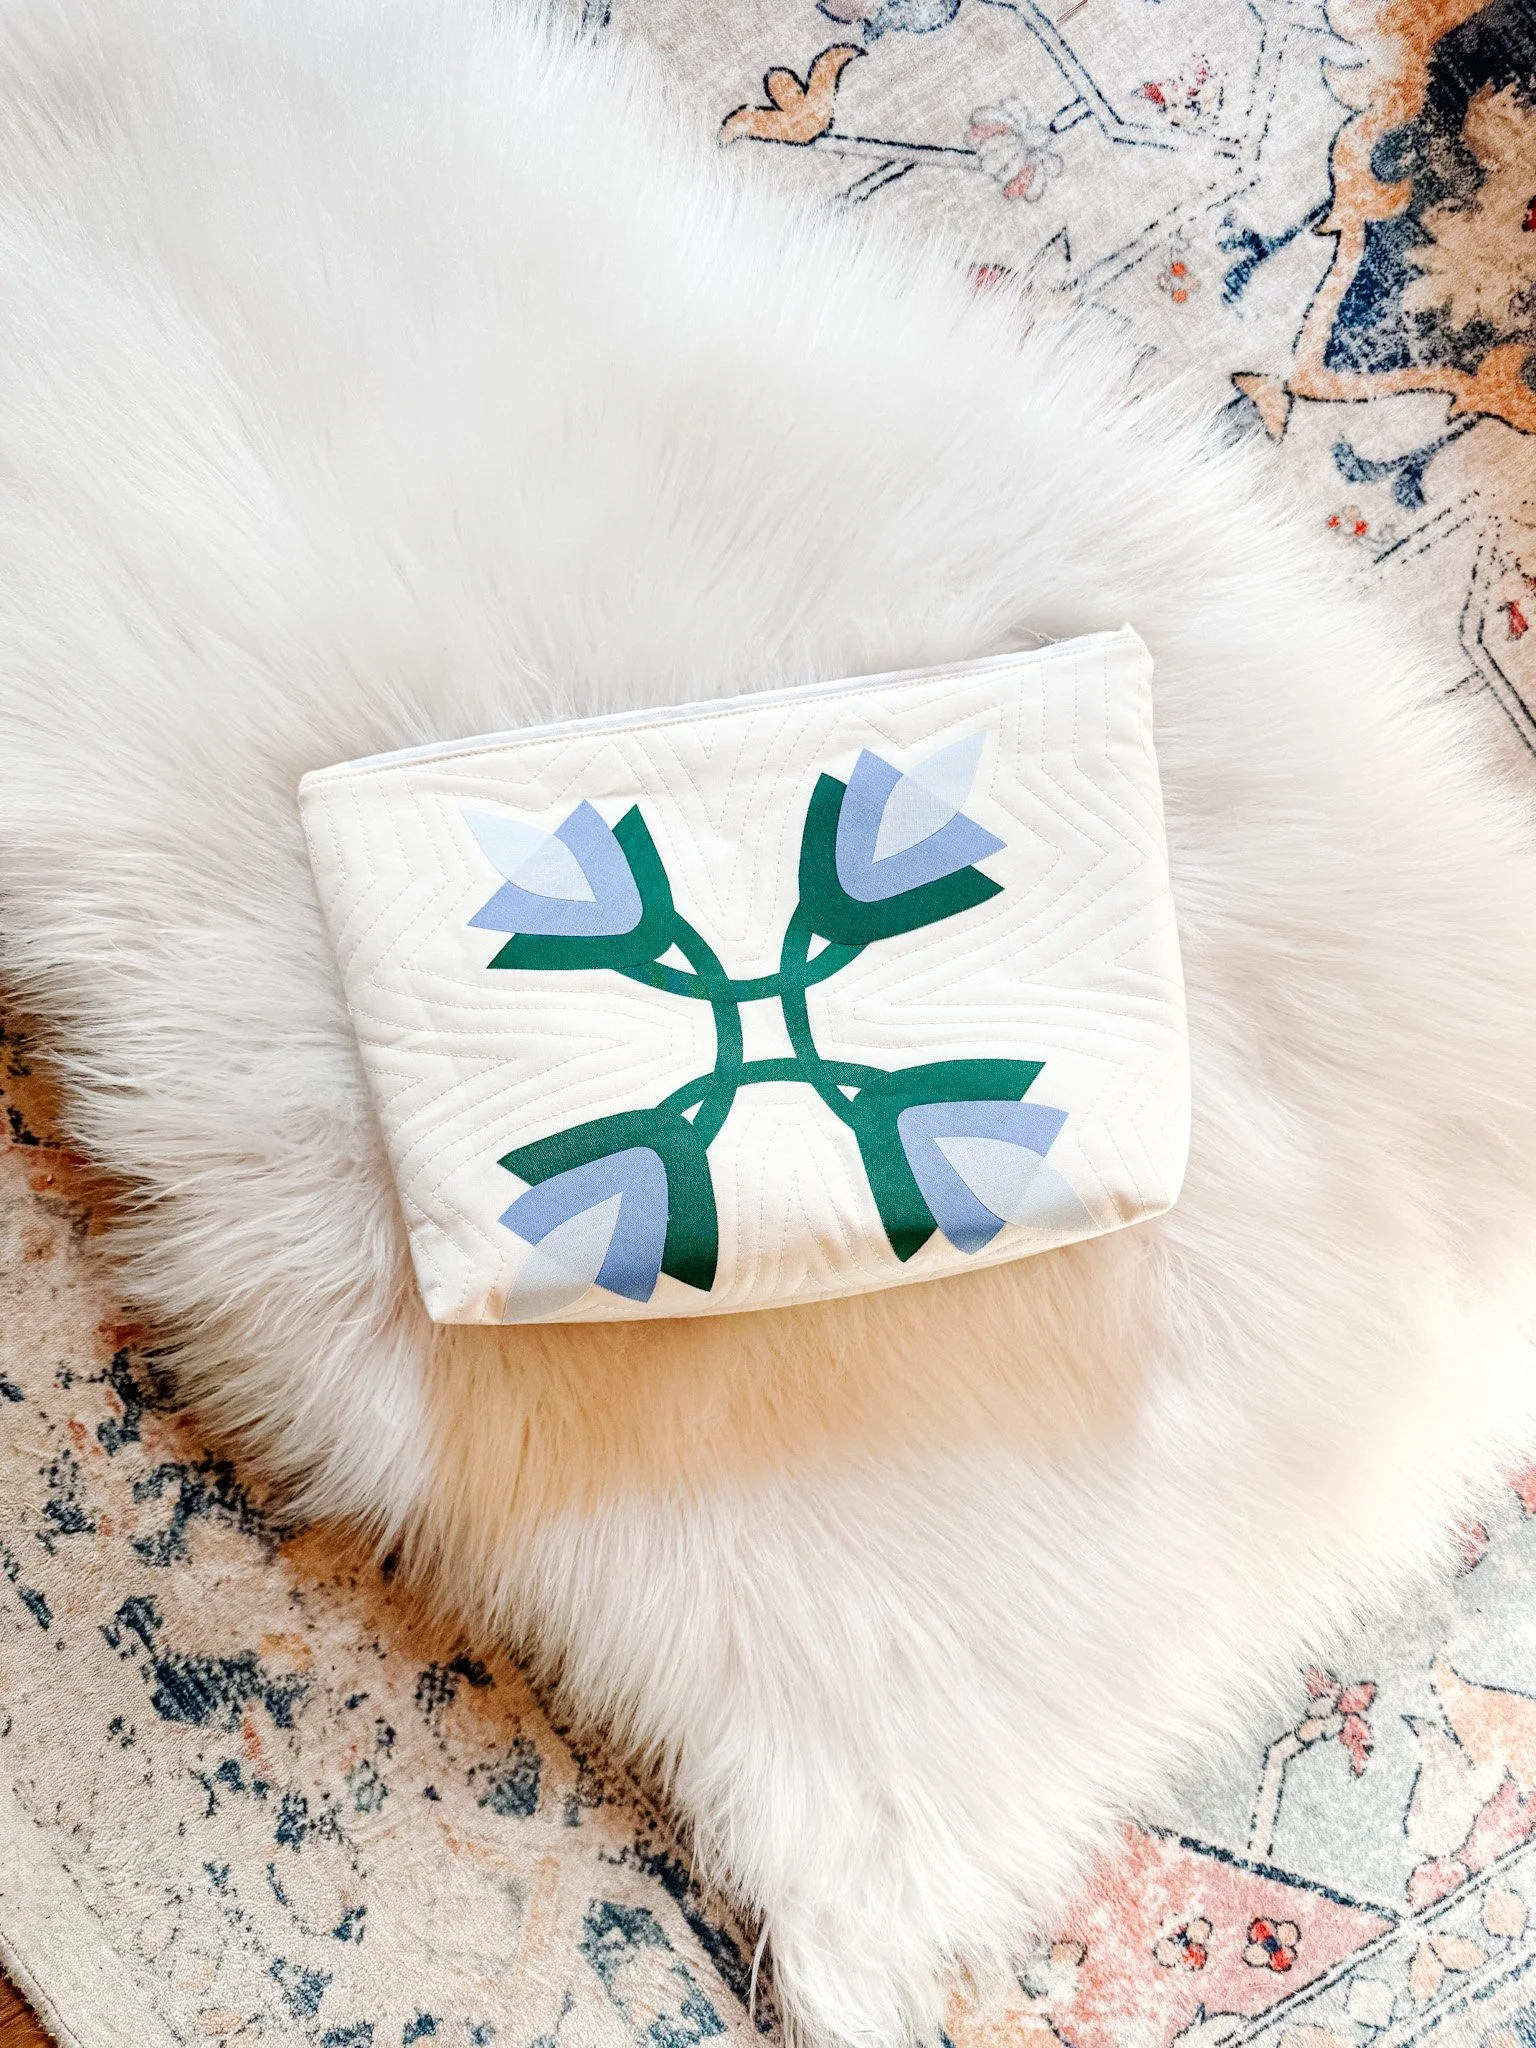
Step-by-Step Guide: Create Stunning Raw Edge Appliqué Quilts With Confidence
Learn how to make an appliqué quilt block with this beginner appliqué quilt tutorial. Step-by-step fusible appliqué instructions, stitching tips, and layout guidance for 2026.
Did you know appliqué is one of the fastest ways to make a quilt look intricate — without actually being complicated? Truly! Once you understand the flow, it’s calm, methodical, and surprisingly forgiving.
In this beginner appliqué quilt tutorial, I’m walking you through the exact simplified steps I use in my patterns — from printing templates correctly to stitching clean edges that last. We’ll cover fusible appliqué using Heat ’N Bond Lite, layout alignment tricks, stitching options, and finishing techniques that make your block look polished (even if it’s your first time).
If appliqué has ever felt intimidating, this is where we fix that! I’ve also filmed a tutorial for you to watch too!
my fave quilting toolsWhat Is Fusible Appliqué and Why It’s Beginner Friendly
If the word appliqué has ever made you feel like you needed a quilting degree before trying it… take a breath. Fusible appliqué is the friendly version. The approachable one. The “you can absolutely do this” method.
Let’s break it down.
What Is Fusible Appliqué?
Fusible appliqué is a technique where fabric shapes are bonded to a background fabric using a lightweight adhesive web. Instead of turning raw edges under by hand (like traditional appliqué), you fuse the shapes in place first — then stitch around the edges to secure them.
In simple terms?
You glue it down. Then you stitch it down.
It’s structured. It’s steady. And it removes a lot of the wobble that makes beginners nervous and I LOVE this technique!
How Fusible Web (Like Heat ’N Bond Lite) Works
Fusible web is a thin sheet of adhesive with a paper backing. Products like Heat ’N Bond Lite have glue on one side and paper on the other.
Here’s the basic idea:
You trace your appliqué shapes onto the paper side. ( I use a mechanical pencil for this)
You fuse the adhesive side to the wrong side of your fabric using heat.
You cut out the shape cleanly.
You peel off the paper backing.
Then you fuse the fabric shape to your background block.
The heat activates the adhesive. When it cools, the shape is temporarily bonded in place — flat, secure, and ready for stitching.
It’s not permanent on its own (you still stitch the edges), but it gives you control before the needle ever hits the fabric.
And control is everything when you’re learning.
check out my amazon list for all my fave toolsWhy Beginners Love Glue-Assisted Placement
Let’s be honest — the hardest part of appliqué isn’t stitching.
It’s placement.
Trying to hold a tiny petal in position while stitching around curves can feel like juggling with one hand tied behind your back. Fusible appliqué removes that chaos. Your shapes stay exactly where you put them, making it really enjoyable to do.
You can:
Step back and adjust before pressing permanently.
Check symmetry.
Overlap shapes cleanly.
Layer from back to front with intention.
Once fused, you can sew slowly and confidently without worrying about shifting pieces.
For beginners, this builds trust. And when you trust your process, your stitches look better automatically.
Fusible Appliqué vs. Needle-Turn Appliqué
Traditional needle-turn appliqué is beautiful. It involves turning raw edges under by hand as you stitch. It’s meditative, precise, and heirloom-level craftsmanship.
But it also takes time. And patience. And practice.
Here’s a simple comparison:
Fusible Appliqué (I teach this method exclusively. All my patterns are based on this technique)
Faster to learn
Great for bold, graphic shapes
Excellent for machine stitching
Ideal for modern quilt projects
Needle-Turn Appliqué
Fully hand-stitched
Soft, rolled edges
No adhesive used
More traditional and time-intensive
Neither is “better.” They’re just different tools.
If you’re just starting out? Fusible appliqué gives you quicker wins. And quick wins build confidence.
Machine Stitching or Hand Stitching?
Once your shapes are fused in place, you have options.
Machine stitching is perfect if:
You want durability.
You’re making items that will be washed often.
You prefer speed.
You love a crisp, clean finish (zig-zag, blanket stitch, or straight stitch all work beautifully. I personally I love a straight stitch!).
Hand stitching is lovely if:
You want a softer, more homespun feel.
You enjoy slow stitching.
You like visible thread as a design feature.
You’re making something decorative rather than high-wear.
There’s no wrong choice. Truly.
Some of my favorite blocks use a simple straight stitch on the machine. Others come alive with perle cotton and a blanket stitch by hand. It depends on the mood you’re after.
Fusible appliqué is forgiving. It’s structured. It gives you time to think before you commit. And that’s exactly why it’s such a powerful starting point.
If you’ve been hesitating, this is your nudge.
Start simple. Fuse carefully. Stitch slowly.
You’ll surprise yourself.

Step 1: Gather Your Appliqué Supplies
Appliqué template PDF
Paper scissors vs. fabric scissors
Clear tape for oversized shapes
Heat ’N Bond Lite or lightweight fusible web
Pencil or fine-tip marker
Iron and pressing surface
Pre-pressed background block
Sewing machine stitch options (zig-zag, blanket, straight) or hand needle and thread
Before we touch fabric, before we plug in the iron — we gather.
Appliqué feels so much easier when everything is within reach. No scrambling. No half-cut shapes while you hunt for tape. Just calm, steady momentum.
Here’s exactly what you need — nothing fancy, nothing overwhelming.
Appliqué Template PDF
Start by downloading your appliqué template PDF. This is your roadmap. Print it at 100% (we’ll talk about that next), and keep it nearby while you work. The template tells you what to trace, what to flip, and how the design comes together. You can find my patterns here: https://thelmaquilts.com/shop/
Paper Scissors vs. Fabric Scissors
Use paper scissors for cutting out the printed templates.
Use fabric scissors for cutting fabric.
I know this sounds obvious… but it matters. Paper dulls fabric blades quickly, and sharp scissors make clean appliqué edges. Clean edges = smoother stitching later.
Clear Tape (For Oversized Shapes)
If your motif prints across multiple pages, clear tape is your best friend. You’ll trim and align the pages so the shape lines up perfectly before tracing. Taping on both sides keeps everything flat and stable — no shifting while you work.
Heat ’N Bond Lite (or Lightweight Fusible Web)
This is what makes fusible appliqué beginner friendly.
Heat ’N Bond Lite (or another lightweight fusible web) temporarily bonds your shapes to the fabric so they stay put while you stitch. It removes the stress of pins. It removes the stress of shifting pieces. It gives you control.
We’re not trying to fight our fabric — we’re guiding it.
Pencil or Fine-Tip Marker
You’ll trace your shapes onto the paper side of the fusible web. A simple pencil works beautifully. Keep your lines clean and visible, but not heavy or messy.
Neat tracing now makes accurate cutting later much easier.
Iron and Pressing Surface
Appliqué is all about pressing — not ironing back and forth, but lifting and setting the iron.
You’ll need:
A reliable iron
A stable pressing surface
(Optional but helpful) a Teflon pressing sheet
Good pressing habits prevent bubbles, distortion, and accidental shifting.
Pre-Pressed Background Block
Before you start placing shapes, press your background fabric. Wrinkles underneath appliqué never disappear — they just get stitched in permanently.
Starting with a smooth block gives you clean placement and a more polished final result.
Stitching Tools: Machine or Hand
Now for the finishing step — stitching.
You can use:
A zig-zag stitch (great for beginners)
A blanket stitch (classic and decorative)
A simple straight stitch (soft, slightly frayed over time — and beautiful)
Or, if you love the rhythm of handwork:
A hand needle and thread
Perle cotton for a visible, homespun finish
There is no “right” method. Only what feels steady and comfortable for you.
When your supplies are gathered, something shifts. The project feels possible. Structured. Simple.
We’re not rushing. We’re setting ourselves up for success — one calm step at a time.
check out my fave tools on amAZONStep 2: Print the Template at 100% (Avoid Sizing Mistakes)
Importance of the 1" test square
How to check scaling accuracy
Printer setting adjustments
When to flip a template horizontally
Why orientation matters for directional shapes
This step feels small. It isn’t.
If your template prints even slightly off-scale, every single shape that follows will be off too. That sweet little flower you carefully cut? Suddenly it’s too big for the block. Or worse — slightly too small and you can’t figure out why your layout looks “wrong.”
So before you cut anything, slow down here.
The 1" Test Square Matters More Than You Think
Every appliqué template includes a 1" test square for a reason. It’s your insurance policy.
After printing, grab a ruler and measure that square. Not “close enough.” Not “that looks fine.” Measure it.
If it reads exactly 1" — you’re good.
If it’s even 1/16" off — adjust and reprint.
That tiny difference multiplies across your entire design. Quilting math is honest like that.
How to Check Scaling Accuracy
When you open your PDF to print, look carefully at the print settings.
You want:
Scale: 100%
Actual Size
NOT “Fit to Page”
NOT “Shrink to Printable Area”
NOT “Scale to Fit”
Many printers default to shrinking slightly to accommodate margins. That’s where the problem starts.
Print one page first. Measure the test square. Only then print the full template.
It takes an extra minute. It saves a lot of frustration.
Adjusting Printer Settings If It’s Off
If your 1" square isn’t accurate:
Go back to your print settings.
Change scaling to “Actual Size” or manually enter 100%.
Turn off auto-scaling features.
Reprint just the template page.
Sometimes it takes one or two tries depending on your printer. That’s normal. Don’t panic — just adjust and check again.
When to Flip a Template Horizontally
This part surprises beginners.
If your template includes letters, text, or shapes that clearly have a “left” and “right” (think birds, stems, or anything directional), you may need to flip the template horizontally before printing.
Why?
Because when you trace onto fusible web and then fuse it to fabric, the shape reverses. If you don’t mirror it first, it will face the wrong direction once applied.
If your shape is symmetrical (like a circle or simple petal), it doesn’t matter.
If it has direction? It absolutely matters.
Why Orientation Matters for Directional Shapes
A stem leaning right instead of left can throw off an entire floral layout. A bird facing outward instead of inward can break symmetry in your block.
Small orientation errors create subtle imbalance — and you’ll feel it even if you can’t immediately see why.
So ask yourself:
Does this shape have a clear direction?
Does it need to face inward toward the center?
Am I working with mirrored pieces?
When in doubt, do a quick paper test. Cut the paper template and place it on your block before tracing. That quick check can save you from re-cutting fabric.
This step isn’t glamorous. But it’s foundational.
Get the scaling right. Check the orientation. Print with intention.
Everything that follows becomes so much easier.
Step 3: Tape Oversized Appliqué Shapes Together
Identifying multi-page templates
Trimming registration edges
Aligning printed outlines precisely
Taping front and back for stability
Ensuring the template lies flat before tracing
Sometimes your appliqué shapes are just too lovely (or too large) to fit on one sheet of paper. When that happens, your template will print across multiple pages — and that’s completely normal. We just need to put it back together properly before we trace.
Here’s how to do it without frustration.
Identifying Multi-Page Templates
If a shape prints across more than one page, you’ll notice cut-off edges or dotted overlap lines near the margins. That’s your signal that this piece needs to be assembled before tracing.
Don’t start cutting out the shape yet. Keep the full pages intact — it makes alignment much easier and more accurate.
Trimming Registration Edges
Most multi-page templates include a dotted overlap or registration edge. Trim along that dotted line on one of the pages so the sheets can sit flush together.
You’re not trimming the shape itself — just removing the excess margin so the printed outlines can meet cleanly.
Take your time here. A clean trim makes the next step smooth and simple.
Aligning Printed Outlines Precisely
Now place the pages side by side and match the printed lines carefully. Focus on the shape’s actual outline, not the paper edges. The goal is to make the shape look seamless — as if it had always been printed on one page.
This is where patience pays off. Even a millimeter off can slightly distort your final shape, so nudge the pages until everything lines up perfectly.
I like to hold the pages up to a bright window or light if I need a little extra visual help.
Taping Front and Back for Stability
Once everything lines up, add a strip of clear tape across the seam on the front (the printed side). Press it down firmly.
Then flip the pages over and add a second strip of tape on the back. This reinforces the join and keeps the template stable while you trace.
That second strip really matters — it prevents shifting and bubbling while you’re working.
Ensuring the Template Lies Flat Before Tracing
Run your hand over the seam to smooth any ridges or bumps. Your template should lie completely flat on the table. If it buckles or overlaps, your traced shape won’t be accurate.
A flat template means clean tracing lines. Clean tracing lines mean clean appliqué shapes.
And that’s the goal — steady, intentional steps that make everything easier later.
Once your template is smooth and secure, you’re ready to move on to tracing onto your fusible web.
Step 4: Trace Templates onto the Paper Side of Fusible Web
Placing template face-up
Positioning Heat ’N Bond paper side up
Tracing clean outlines
Leaving at least ½" between shapes
Avoiding overlap issues
This is the quiet, methodical part. Nothing flashy. Just careful tracing — and it makes everything that comes after feel easier.
First, place your printed template face-up on your work surface. You want to clearly see the outlines you’ll be tracing. Smooth it flat so there are no ripples underneath.
Next, lay your fusible web (like Heat ’N Bond Lite) paper side up over the template. The rough, glue side should be facing down. If you accidentally flip it, you’ll know — the paper side is the one you can write on. That’s your tracing surface.
Now trace each shape carefully with a pencil or fine-tip marker. Don’t rush this. Follow the printed lines slowly and confidently. Clean outlines here mean crisp edges later when you cut your fabric motifs.
As you trace, be sure to leave at least ½ inch between shapes. This matters more than people think. If you crowd them too closely, the fusible adhesive can overlap when you press, which creates sticky messes on your ironing board (ask me how I know). Giving each shape a little breathing room prevents accidental bonding and keeps your pieces separate and easy to manage.
Think of this step as prep work for accuracy. Calm tracing now means smooth cutting later. And smooth cutting means appliqué pieces that look intentional and polished once stitched down.
Slow and steady here. You’re building the foundation.
Step 5: Rough-Cut the Fusible Shapes
Why you cut ¼" outside the traced line
Benefits of trimming precisely after fusing
Keeping edges smooth for accurate final cuts
This is the part where a lot of beginners slow down too much.
Don’t.
At this stage, you are not cutting perfectly. You’re cutting generously.
After tracing your shapes onto the paper side of the fusible web, trim each one about ¼" outside the drawn line. Not on the line. Not close to it. A comfortable quarter inch all the way around.
Why?
Because this is a prep cut — not the final cut.
Why Cut ¼" Outside the Line?
Leaving that extra margin gives you flexibility. When you fuse the shape to your fabric in the next step, that little border allows the adhesive to fully bond without risking frayed edges or awkward trimming too early.
It also:
Prevents accidentally cutting inside your drawn line
Keeps the traced shape intact
Makes the fusing step easier to handle
Reduces distortion from over-handling small pieces
Think of this as giving yourself room to breathe.
The Real Precision Happens Later
Once the fusible is adhered to your fabric and fully cooled, that’s when you switch to your sharp fabric scissors and cut directly on the traced line.
Now your shape has stability. The fusible supports the fabric, which means:
Cleaner curves
Smoother points
More accurate silhouettes
Less stretching or shifting
Trying to cut perfectly before fusing often leads to wobbly edges — especially around tight curves or delicate petals.
How to Keep Edges Smooth for the Final Cut
When you go back for the precise cut:
Use sharp fabric scissors (not paper scissors)
Turn the fabric slowly — don’t turn your scissors
Make long, steady cuts around curves
For tight curves, take small snips without creating jagged edges
Avoid “nibbling” at the edge — that’s how bumps happen
Let the scissors glide. Move your fabric with your non-dominant hand. Stay relaxed.
Remember, appliqué isn’t about rushing to perfection. It’s about building clean steps that support the next one.
This rough cut sets you up for a beautiful final shape — and that’s what we’re after.
Step 6: Fuse to Fabric Correctly
Pre-pressing appliqué fabric
Positioning glue side down on wrong side of fabric
Using a Teflon pressing sheet
Pressing 5–8 seconds (medium-hot/wool setting, no steam)
Allowing fabric to cool before handling
This is the step where everything starts to feel real. Your shapes go from paper outlines… to actual fabric motifs you can hold in your hands. Slow down here. Precision matters — but it’s still simple.
Pre-press Your Appliqué Fabric
Before you fuse anything, give your appliqué fabric a good press.
Wrinkles, folds, or creases will permanently set once the fusible web is applied. You want a smooth surface so your shapes stay crisp and accurate. No steam here — just a clean, dry press to flatten everything out.
Think of this as setting the stage. Smooth fabric = clean results.
Position Glue Side Down on the Wrong Side
Once your fusible shapes are rough-cut, place them glue side down onto the wrong side of your fabric.
Paper side facing up.
Adhesive side touching fabric.
If you’re ever unsure, lightly scratch the fusible — the rough side is the glue side.
Take a second to double-check placement before you press. Once heat is applied, it bonds quickly.
Use a Teflon Pressing Sheet
Lay a Teflon pressing sheet (or parchment paper) over your fabric before pressing.
This protects:
Your iron
Your pressing surface
And your sanity if glue sneaks out beyond the edges
It’s a small step that prevents a sticky mess later.
Press — Don’t Slide
Set your iron to a medium-hot / wool setting with no steam.
Press down firmly for 5–8 seconds, then lift the iron straight up and move to the next section.
Do not slide the iron. Sliding can shift your fusible shape and distort edges — especially with curves.
Lift. Press. Lift again.
Let It Cool Before Handling
This part is often skipped — but it matters.
After pressing, let the fabric cool completely before cutting or moving it. The adhesive needs a few moments to set and stabilize. If you peel or shift while it’s warm, the bond can weaken.
Give it a minute. It’s worth it.
Once cooled, your shapes are ready for precise cutting — and the fun really begins.
Appliqué isn’t complicated. It’s just a series of small, thoughtful steps done in order. And you’re doing great.
Step 7: Cut the Fabric Motifs on the Drawn Lines
Switching to sharp fabric scissors
Cutting exactly on traced outlines
Peeling paper backing at the right time
Preventing stretching while cutting
This is where it starts to feel real.
You’ve traced. You’ve fused. Everything is cooled and ready. Now it’s time to turn those rough-cut shapes into clean, finished fabric motifs.
First — switch to sharp fabric scissors. Not your paper scissors. Not the ones you used to trim the fusible. A clean, sharp pair makes all the difference here. Dull blades can chew the edge slightly, and that shows once you stitch.
Cut exactly on the traced line.
Not inside it. Not outside it. Right on it.
This is why we rough-cut earlier — that extra ¼″ margin gave us breathing room so now we can cut cleanly and confidently. Move slowly around curves. Turn the fabric, not your wrist. On tight corners, take small, controlled snips instead of one big cut.
And here’s an important detail beginners often miss:
Don’t peel the paper backing yet unless you’re ready to arrange the design.
Keeping the paper on while you cut gives the shape stability. It helps prevent stretching, especially on curves or bias edges. Once the paper is removed, the fabric becomes more flexible — which is great for placement, but not for precision cutting.
If you notice the fabric shifting while you cut, pause. Lay it flat. Keep your non-cutting hand close to the blade (but safely away!) to gently stabilize the area you’re trimming. Avoid lifting the shape too much off the table — gravity can subtly distort it.
When you’re done, you should have crisp, smooth edges that match your template exactly.
It’s a small step. But this is what makes your appliqué look polished before you’ve even stitched a single line.
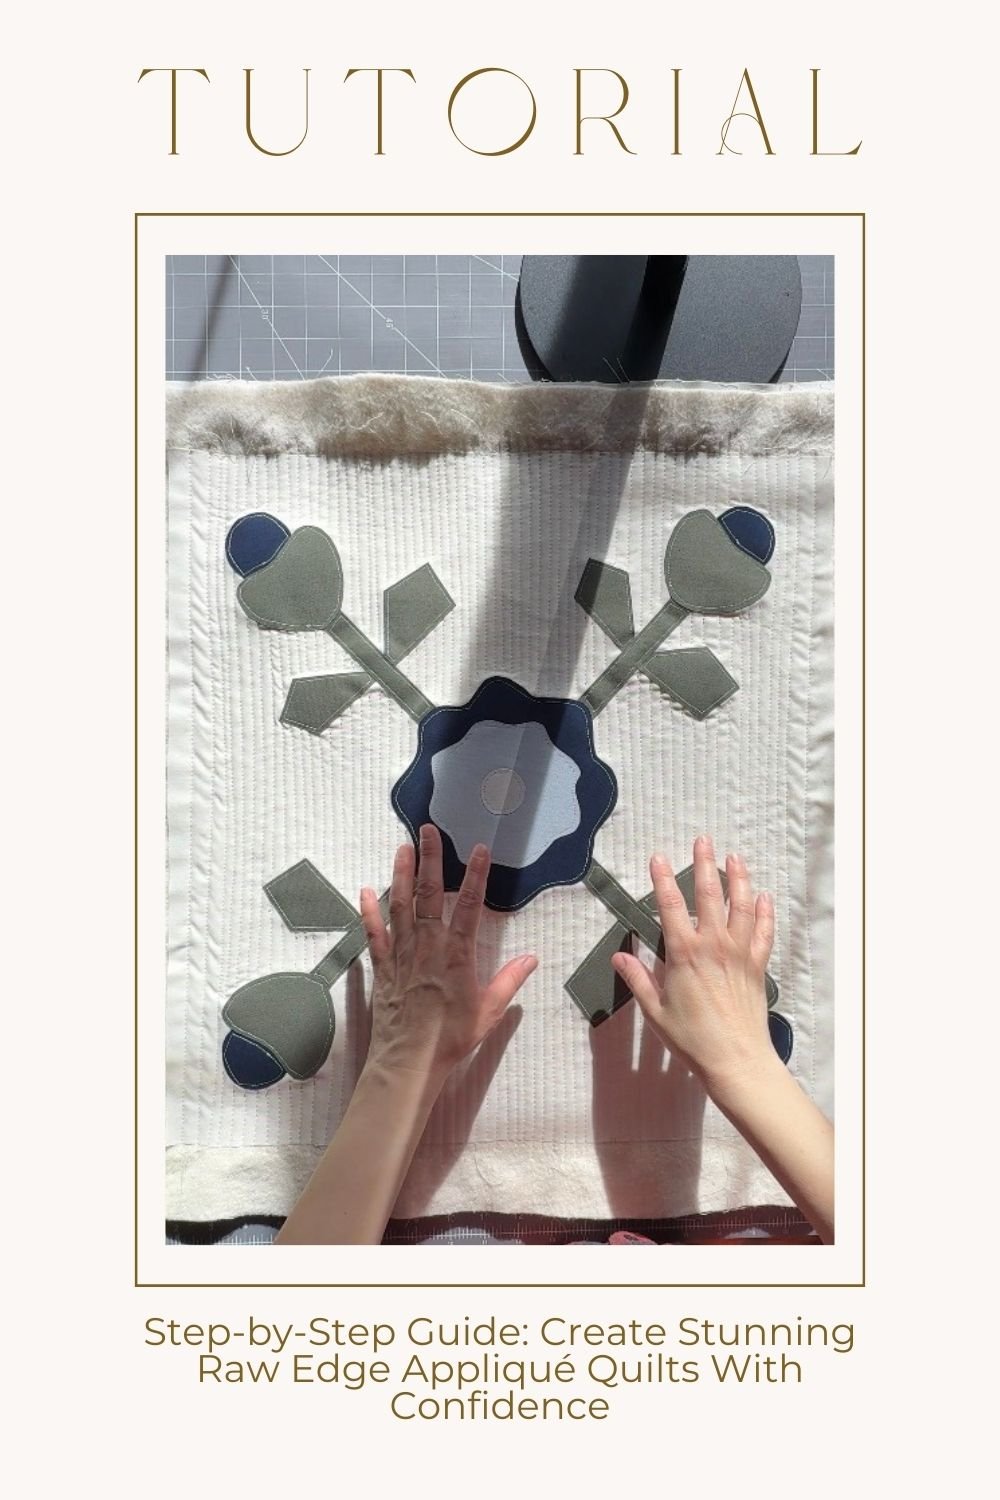
Step 8: Lay Out the Design on the Background Block
Pressing the background first
Drawing alignment lines (corner-to-corner “X” and cross)
Finding the true center point
Arranging shapes from back to front
Overlapping correctly
Using washable glue stick for temporary placement
Stepping back to check symmetry before fusing
This is the step where everything starts to feel real.
You’ve traced. You’ve fused. You’ve cut your shapes carefully. Now it’s time to bring the design together — and placement matters more than people think. The good news? We’re going to make it simple and controlled.
Press the Background First
Start by giving your background block a good press. Flat fabric is easier to mark, easier to measure, and much easier to place shapes on accurately.
Wrinkles can throw off alignment — even if it doesn’t look like much at first. A smooth foundation makes everything that follows calmer and more precise.
Draw Your Alignment Lines
This is the trick that changes everything.
Using a chalk pencil or removable fabric marker:
Draw a line from one corner to the opposite corner.
Repeat for the other two corners to form an “X.”
Then draw one vertical line and one horizontal line, splitting the block into four equal sections (a “cross”).
Where the X and cross intersect is your true center point.
Now you’re not guessing anymore. You have a visual guide.
Find the True Center
That center intersection is your anchor.
Most appliqué designs are built around a central element — a flower center, a stem, a focal shape. Start by aligning that main piece right on the center point. This keeps your design balanced and prevents everything from drifting off to one side.
Even if the pattern diagram looks centered, your eye can be fooled. The drawn guidelines keep things honest.
Arrange Shapes from Back to Front
Always build your design in layers.
Start with the shapes that sit at the back — usually stems, large petals, or background elements. Then layer forward with mid-sized shapes. Finish with the smallest pieces that sit on top.
If you try placing everything at once, it gets overwhelming. Layering makes it manageable.
Overlap Intentionally
Don’t just butt edges up against each other.
Appliqué designs typically rely on slight overlapping so pieces feel connected and natural. A leaf might tuck slightly under a petal. A stem may disappear just a touch behind a bloom.
Refer to your pattern diagram, and allow shapes to overlap exactly as intended. This prevents awkward gaps and makes the design feel cohesive.
Use a Washable Glue Stick for Temporary Placement
Before permanently fusing, I like to lightly glue-baste the shapes in place.
A simple washable school glue stick works beautifully. Apply a small swipe to the back of each piece — just enough to hold it — and press it into position.
This keeps everything from shifting when you move the block or take it to the ironing board. It also allows you to adjust placement if needed before final fusing.
Step Back and Check Symmetry
This is the part most beginners skip — and it makes all the difference.
Physically stand up. Step back a few feet. Look at the block from a distance.
Is it balanced?
Is one side slightly heavier?
Are petals evenly spaced?
Does anything feel crooked?
Your eye sees symmetry much better from afar than up close.
Make any tiny adjustments now. Once you fuse permanently, changes are much harder.
When it looks balanced and intentional — then you’re ready to fuse.
Placement is quiet work. It’s patient work. But this is where your appliqué goes from “just shapes” to a finished design that feels thoughtful and steady.
Step 9: Fuse the Motifs Permanently
Covering with pressing sheet
Lifting and setting the iron (no sliding)
Pressing 5–8 seconds
Cooling flat to set adhesive fully
This is the moment it all becomes official.
Your shapes are arranged. You’ve stepped back. You’ve adjusted that one petal three times (it’s fine, we all do it). Now it’s time to commit.
Start by placing a Teflon pressing sheet over your entire block. This protects both your fabric and your iron from any exposed fusible adhesive. Even if everything looks perfectly placed, that extra layer is insurance — and worth it.
Now here’s the important part: lift and set your iron. Do not slide it.
Sliding can shift your motifs out of alignment, especially smaller shapes or layered pieces. Instead, lower the iron straight down, hold it in place for about 5–8 seconds using a medium-hot or wool setting (no steam), then lift it completely before moving to the next area. Think gentle presses, not ironing a shirt.
Work your way across the block this way — lift, press, lift, press — until every section has been fused.
Once you’re done, let the block cool completely while lying flat. This step matters more than people realize. The adhesive needs time to fully set, and moving the block too soon can weaken the bond.
Give it a minute. Let it rest.
When it’s cool, your motifs will feel secure and smooth — ready for stitching.
Step 10: Stitch the Appliqué Edges (Machine & Hand Options)
Machine Stitch Options
Zig-zag stitch (approx. 3.0 width / 1.6 length)
Blanket stitch (approx. 2.5 length / 3.0 width)
Straight stitch (2.0–2.5 mm for soft frayed look)
Stitch length adjustments for tight curves
Pivoting at points with needle down
Hand Stitch Options
Perle cotton + blanket stitch
Creating a homespun look
Choosing matching vs. contrasting thread
Testing stitches on scrap fabric
This is the step where everything starts to feel real.
Your shapes are fused. They’re sitting exactly where you want them. Now you’re simply securing the edges so your quilt block can handle real life — washing, quilting, loving, using.
There’s no “right” stitch here. Just different looks. Different personalities. Let’s walk through them.
Machine Stitch Options
If you’re using a sewing machine, keep it simple. You don’t need anything fancy.
Zig-zag stitch
This is my personal favorite for beginners. It’s forgiving and much easier to control than it looks.
Width: about 3.0 mm
Length: about 1.6 mm
Keep the right swing of the stitch just barely off the appliqué edge
The zig-zag wraps the raw edge nicely and holds everything in place. It’s strong. It’s practical. And once you get into a rhythm, it feels almost meditative.
Blanket stitch
If you love a slightly more traditional, decorative look, blanket stitch is beautiful.
Length: about 2.5 mm
Width: about 3.0 mm
This gives that classic appliqué outline — clean little “L” shapes hugging the edge. It looks more detailed, but it does take a little more focus to keep it even.
Straight stitch (simple + soft)
If you want ultra simple and modern, choose a straight stitch.
Length: 2.0–2.5 mm
This option will fray slightly over time, which creates a soft, lived-in finish. I actually love this look. It feels relaxed and handmade — not stiff or overworked.
A Few Machine Stitching Tips
Shorten your stitch length around tight curves. This helps your line look smooth instead of choppy.
Pivot at sharp points with the needle down. Lift the presser foot, turn your fabric, lower the foot, and keep going.
Go slowly. There is no prize for speed here.
Always test your stitch on a scrap first. Adjust tension if needed before stitching your actual block.
Hand Stitch Options
If you prefer slow stitching — or you just love that cozy, heirloom feel — hand stitching is beautiful.
Perle cotton + blanket stitch
This combination creates a bold, visible outline around your shapes. It adds texture. It adds personality. It feels intentionally handmade.
It’s also wonderfully forgiving.
Creating a Homespun Look
Hand stitching gives you space to embrace imperfection. Slightly uneven stitches? That’s charm. Tiny shifts in spacing? That’s character.
This is especially lovely for floral appliqué or vintage-inspired designs where you want warmth instead of precision.
Matching vs. Contrasting Thread
You get to decide the mood here.
Matching thread blends quietly into the fabric for a soft, subtle finish.
Contrasting thread turns your stitching into a design feature. It adds folk-art energy and visual definition.
Neither is better. It’s just about the feeling you want your piece to have.
Always Test First
Before you commit — machine or hand — stitch on a scrap.
Check:
Tension
Stitch length
Thread color
How the fabric reacts
Five minutes of testing can save you from ripping out stitches later.
Once your edges are stitched, your appliqué is secure. Press from the back, trim stray threads, and take a moment to admire your work.
You just stitched appliqué. And you did it beautifully.
Step 11: Press, Trim, and Finish the Block
Pressing from the back on a thick towel
Maintaining dimensional edges
Trimming stray threads
Preparing for sandwiching, basting, and quilting
This is the quiet, satisfying part. The part where everything starts to look finished.
Once your appliqué is stitched down, resist the urge to rush ahead. A good final press makes all the difference.
Press from the Back (On a Thick Towel)
Flip your block over and place it wrong side up on a thick towel. Not your regular ironing board — a towel.
Here’s why: the towel cushions the stitched appliqué edges. Instead of smashing them flat, it lets them sink slightly into the softness while you press from behind. That keeps your stitching crisp and your shapes beautifully defined.
Use a medium heat. Lift and set the iron — don’t drag it. Let the heat do the work.
Maintain Those Dimensional Edges
Appliqué has texture. That’s part of its charm.
Pressing from the back helps maintain that subtle lift along the stitched edges. You want your petals, leaves, or shapes to feel alive, not laminated to the surface. That gentle dimension gives your block depth once it’s quilted.
If you press too aggressively from the front, you’ll flatten that magic. So go easy. Let it breathe.
Trim Stray Threads
Now take a moment to clean it up.
Snip any loose threads. Check curves and corners. If you see a tiny whisker from a zig-zag or straight stitch, trim it carefully with sharp thread snips.
This tiny step elevates your block from “almost done” to polished.
Prepare for Sandwiching, Basting, and Quilting
Once pressed and cleaned up, your appliqué block is ready for the next stage.
Square it up if needed. Make sure the edges are tidy and measurements are accurate. From here, you can:
Add borders
Turn it into a pillow or tote panel
Or build your quilt top
When you’re ready, you’ll move on to making your quilt sandwich — backing, batting, and top — followed by basting and quilting.
And here’s the truth: if your appliqué is secure and properly pressed, quilting over it feels easy. Calm. Confident.
You’ve done the careful work.
Now you get to enjoy the finishing.
Common Beginner Appliqué Mistakes (And How to Avoid Them)
Printing at the wrong scale
Forgetting to mirror directional shapes
Sliding the iron while fusing
Not cooling before moving fabric
Stitching without testing tension
Ignoring alignment guides
Common Beginner Appliqué Mistakes (And How to Avoid Them)
Let’s be honest — most appliqué “problems” aren’t skill issues. They’re tiny technical things that snowball. The good news? Once you know what to watch for, they’re completely avoidable.
Here are the most common beginner appliqué mistakes I see (and how to fix them before they happen).
Printing at the Wrong Scale
This one is sneaky.
If your template isn’t printed at 100% scale, your shapes won’t be the right size. That means they won’t align properly, and your finished block won’t measure correctly.
How to avoid it:
Always check the 1" test square with a ruler.
Make sure your printer settings say “Actual Size” or “100%.”
Avoid “Fit to Page” — that setting is not your friend.
Take the extra 30 seconds to check. It saves so much frustration later.
Forgetting to Mirror Directional Shapes
If your design includes letters, words, or shapes with a clear left/right direction, you may need to flip (mirror) the template before printing.
Remember: when you trace onto fusible web and then fuse it to the wrong side of fabric, the shape flips.
If you don’t mirror it first, your finished piece could face the wrong way.
How to avoid it:
Ask yourself: does this shape have a clear direction?
If yes, mirror it horizontally before printing.
Do a quick “paper flip test” before tracing.
It’s a tiny detail — but it matters.
Sliding the Iron While Fusing
When you fuse appliqué pieces, you should lift and press. Not glide.
Sliding the iron can shift your shapes, distort placement, and stretch the background fabric.
How to avoid it:
Place the iron down.
Hold for 5–8 seconds.
Lift straight up.
Move to the next area.
Think of it as stamping the heat down, not ironing wrinkles out.
Not Letting the Block Cool Before Moving It
This one trips up so many beginners.
Fusible adhesive needs time to set as it cools. If you move the block immediately after pressing, the shapes can lift or shift slightly.
How to avoid it:
After fusing, let the block cool completely.
Keep it flat while it cools.
Resist the urge to “just check” the edges.
Patience here makes your stitching stage so much easier.
Stitching Without Testing Tension
Jumping straight onto your block without testing stitch settings can lead to puckering, tunneling, or uneven zig-zags.
And then you’re unpicking. Which no one enjoys.
How to avoid it:
Use a scrap sandwich (background + fused scrap).
Test your stitch width and length.
Adjust tension if needed.
Practice curves and points before stitching the real block.
Five minutes of testing saves twenty minutes of seam ripping.
Ignoring Alignment Guides
Those center lines you draw on your background block? They aren’t optional. They’re your anchor.
Without them, shapes can drift slightly off-center — and you may not notice until it’s stitched.
How to avoid it:
Draw an “X” corner to corner.
Add vertical and horizontal center lines.
Align your main motif with the true center point.
Step back and visually check symmetry before fusing permanently.
Appliqué is visual. Trust your eyes — and give them guides to work with.
The Bottom Line
Appliqué isn’t hard. It’s just precise.
Most beginner mistakes happen because we rush. Slow down. Check your scale. Press, don’t slide. Let things cool. Test your stitches.
You don’t need to be perfect. You just need to be thoughtful.
And once you get into the rhythm? It becomes one of the most satisfying parts of quilting.
Best Threads and Stitch Settings for Clean Results
50 wt cotton thread for subtle finish
When to contrast thread for folk-art charm
Tension adjustments for fusible appliqué
Choosing needle types for cotton fabric
This is the part that makes people nervous — but it really doesn’t need to. Thread and stitch settings aren’t about perfection. They’re about preference. Once you understand the basics, you can absolutely make it your own.
50 wt Cotton Thread for a Subtle Finish
If you want your stitching to quietly blend into the fabric, 50 weight cotton thread is a beautiful choice. It’s fine enough to sink into the applique edge without looking bulky, which gives you that clean, polished look.
That said — I’ve used 40 wt and even 30 wt threads with gorgeous results too. Thicker threads add personality. They sit a little more on top of the fabric and create texture. Sometimes that’s exactly what you want.
So don’t be afraid to experiment. Stitch a small scrap. Try different weights. You’ll quickly learn what feels like you.
When to Contrast Thread for Folk-Art Charm
Matching thread disappears. Contrasting thread speaks up.
If you’re working with vintage-inspired florals or want a sweet, folk-art feel, try using a thread that’s slightly darker or lighter than your appliqué fabric. It outlines the shape and gives it definition. It feels intentional and handcrafted — in the best way.
This works especially well with blanket stitch or a slightly wider zig-zag. It adds character without feeling busy.
If your style leans softer and quieter, match your thread closely to the fabric. If you want a little personality? Let it show.
Tension Adjustments for Fusible Appliqué
Fusible web adds a layer between your fabric and your background, which means your machine may behave slightly differently than it does when piecing.
A few simple tips:
Always test on a scrap layered exactly like your quilt block (background + fusible + appliqué fabric).
If you see loops on the back, tighten your top tension slightly.
If the stitches look tight or puckered on top, loosen your top tension just a touch.
Shorten your stitch length around tight curves for smoother edges.
Small adjustments make a big difference. And remember — test first. It saves frustration later.
Choosing the Right Needle for Cotton Fabric
For quilting cotton and fusible appliqué, a sharp needle makes everything smoother.
I recommend:
A Microtex (sharp) needle for crisp, clean stitching.
A Universal needle if that’s what you have on hand — it will work just fine.
Size 80/12 for most quilting cotton.
Size 90/14 if you’re using thicker 40 wt or 30 wt thread.
If your stitches start skipping or you notice fraying, change your needle. It’s the simplest fix and often the one we forget.
Thread weight. Stitch width. Needle size. These are tools — not rules. The goal isn’t perfection. It’s finding the combination that feels good under your hands and gives you the finish you love.
Test. Adjust. Trust your eye. And keep stitching.
Conclusion
Appliqué doesn’t have to feel complicated. When you break it down — print accurately, trace carefully, fuse intentionally, stitch slowly — it becomes one of the most satisfying techniques in quilting.
Start with one block. Test your stitches. Give yourself permission to learn as you go. In 2026, appliqué is less about perfection and more about confident, thoughtful making.
Ready to try your first beginner appliqué quilt block? Download a pattern and start stitching.
pin it for later